After a longer-than-planned hiatus, I’m back. And hopefully I have some new stuff that will make your teaching life easier!
Last May I explained in a post how to use MS Word and Excel to create grade reports. As I was walking across campus this week, I ran into my colleague in Engineering, Rich Bankhead. He had a great idea.
He gives his Engineering students a take-home final that includes solving mathematical problems. This quarter, he gave each student their own data. Students aren’t supposed to work with each other on this assignment, but if they do, they at least have to work the problems separately for each person.
I’m guessing that Rich’s problems are more difficult than this, but for the purpose of this post, I’ll keep it simple.
In Word, create the assignment.

In Excel, you need one column of names, one column of email addresses (if you plan on emailing the assignments to students), and finally a column for each variable. Save the file and close it.

Let’s merge!
In your Word file, on the Mailings tab, click the down arrow next to ‘Select Recipients.’ Select ‘Use Existing List.’ Locate and open your Excel spreadsheet, and select the worksheet within that spreadsheet that you want. It will look like nothing’s happened, but these two Word and Excel files are now linked.

Now let’s tell Word which Excel fields we want and where we want to put them. Let’s start with names. In your Word document, put your cursor where you want to put the student’s name. On the Mailings tab, click the down arrow under ‘Insert Merge Field.’ Notice that all of the column names from your Excel file are here.
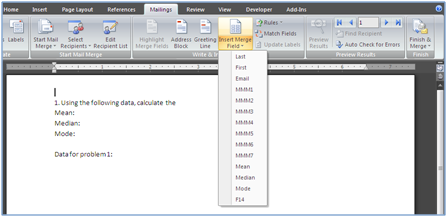
Select ‘First.’ This is added where your cursor was: <<First>>. You can treat this like any other text. I’m going to type a space, then add ‘Last’ using the same process, then I’m going to make the type a little bigger and bold, and add a space under the name.

Let’s add the data. I’ll select my first data field (MMM1), add a comma and a space after it, then my second data field (MMM2), then another comma and a space and so on.

Merge and print (or email).
Click ‘Preview Results’ to see how the assignment will look to students. If you click the arrows to the right of ‘Preview Results’ you can flip through the rest of the students in your class. If don’t like how something looks, you can edit your document here or you can click ‘Preview Results’ to go back to field view you were working with before.

When your document is how you want it to look, click ‘Finish & Merge.’ If you select ‘Print Documents,’ you’ll print a separate page for each student in your spreadsheet. If you choose ‘Send E-mail Messages’, you’ll get this pop-up window:

If you have a column labeled ’email’ Excel is smart enough to default to that. If what it chooses is incorrect, click the arrow to the right to select a different column from your spreadsheet. Type in something appropriate for the subject line. When you hit OK, Word will use email program to send an email to each of your students.
Tips for creating individualized data in Excel.
Let Excel do the work. Use the RANDBETWEEN command to generate your data. For example, if you wanted to generate a number between 1 and 30, in an Excel field, type =randbetween(1,30). Notice the solid border around cell D2? If you mouse over the little box in the bottom right corner of that cell, your pointer will turn into a plus sign.

Left click and drag it to the right. This will copy your formula in every cell you highlight.

Now highlight all of the cells in that row you’d like to copy, mouse over the box in the bottom right corner of your selected cells, left click, and drag down.

IMPORTANT: Notice that each time you do something with a cell, such as copy a formula from one cell to the next, the number in all of the RANDBETWEEN cells changed. Each time you enter something into a cell in this spreadsheet, all of your randomly generated numbers will change.
Convert formulas to values. If you’d like your randomly generated numbers to stick so they’re not changing every time you do something in this spreadsheet, highlight the cells that contain the formula, click ‘copy’ (or CTRL-C), then click the down arrow under ‘paste,’ and select ‘Paste Values’ (or ALT-H,V,V).

What else do you need?
Are you looking for easier ways to do things in Word, Excel, or Outlook? Leave your questions in the comments below, and I’ll see if I can find some shortcuts for you.


